3.2. Assign dynamic IPs to BMCs
There are two ways of doing this:
you specify a static IP by setting it in the BIOS of each compute node
you let BMCs determine an IP via DHCP
For our systems, all BMCs are already configured to use DHCP. You can
listen to the traffic coming into 192.168.0.1 using the tcpdump
utility. But before we can use tcpdump, we have to configure the firewall.
3.2.1. Configure firewall
Allow all traffic from eno2 and eno3 networks
Disable SELinux
Check if SELinux is disabled.
[root@master ~]# getenforce
Enforcing
You can temporarily disable SELinux using
setenforceto change the mode toPermissive, which loads the security policy but prints warnings instead of enforcing the policy.[root@master ~]# setenforce 0 [root@master ~]# getenforce Permissive
To disable SELinux, edit
/etc/selinux/config, setSELINUX=disabledand reboot.# This file controls the state of SELinux on the system. # SELINUX= can take one of these three values: # enforcing - SELinux security policy is enforced. # permissive - SELinux prints warnings instead of enforcing. # disabled - No SELinux policy is loaded. SELINUX=disabled # SELINUXTYPE= can take one of three values: # targeted - Targeted processes are protected, # minimum - Modification of targeted policy. Only selected processes are protected. # mls - Multi Level Security protection. SELINUXTYPE=targeted
Disable firewalld
[root@master ~]# systemctl disable firewalld
[root@master ~]# systemctl stop firewalld
We will not be using firewalld, but configure iptables directly. iptables and ip6tables are used to setup, maintain and inspect the tables for IPv4 and IPv4 packet filter rules in the Linux kernel.
Install iptables services
While iptables is part of the Linux kernel, to automatically load rules during boot own init system will have to load them from somewhere. On systemd-based systems, this is usually done through a systemd service. On RHEL and Rocky Linux this service is installed via
iptables-servicespackage.[root@master ~]# dnf install iptables-services ... [root@master ~]# systemctl enable iptables [root@master ~]# systemctl start iptables [root@master ~]# systemctl status iptables ● iptables.service - IPv4 firewall with iptables Loaded: loaded (/usr/lib/systemd/system/iptables.service; enabled; vendor preset: disabled) Active: active (exited) since Tue 2025-06-10 14:58:34 EDT; 6s ago Process: 2827 ExecStart=/usr/libexec/iptables/iptables.init start (code=exited, status=0/SUCCESS) Main PID: 2827 (code=exited, status=0/SUCCESS) Jun 10 14:58:34 master systemd[1]: Starting IPv4 firewall with iptables... Jun 10 14:58:34 master iptables.init[2827]: iptables: Applying firewall rules: [ OK ] Jun 10 14:58:34 master systemd[1]: Started IPv4 firewall with iptables.
You can view the active set of iptables rules with the
iptables-savecommand.[root@master ~]# iptables-save # Generated by iptables-save v1.4.21 on Mon Feb 4 12:39:38 2019 *filter :INPUT ACCEPT [0:0] :FORWARD ACCEPT [0:0] :OUTPUT ACCEPT [63:5564] -A INPUT -m state --state RELATED,ESTABLISHED -j ACCEPT -A INPUT -p icmp -j ACCEPT -A INPUT -i lo -j ACCEPT -A INPUT -p tcp -m state --state NEW -m tcp --dport 22 -j ACCEPT -A INPUT -j REJECT --reject-with icmp-host-prohibited -A FORWARD -j REJECT --reject-with icmp-host-prohibited COMMIT # Completed on Mon Feb 4 12:39:38 2019
The default rules need to be adjusted to meet our requirements. They are defined in
/etc/sysconfig/iptables. Open a text editor and edit them.*filter :INPUT DROP [0:0] :FORWARD DROP [0:0] :OUTPUT ACCEPT [0:0] -A INPUT -m state --state RELATED,ESTABLISHED -j ACCEPT -A INPUT -p icmp -j ACCEPT -A INPUT -i lo -j ACCEPT -A INPUT -i eno2 -j ACCEPT -A INPUT -i eno3 -j ACCEPT -A INPUT -p tcp -m state --state NEW -m tcp --dport 22 -j ACCEPT -A INPUT -j REJECT --reject-with icmp-host-prohibited -A FORWARD -j REJECT --reject-with icmp-host-prohibited COMMIT
This will block all traffic except from the local network (
lo), internal networkseno2andeno3, and SSH and ICMP (ping) on everything facing outside. Usually it’s a good idea to lock it down even more, but for now, let’s use this configuration.Finally, apply this configuration by reloading the
iptablesservice.[root@master ~]# systemctl reload iptables
Verify the active configuration using
iptables-save.Complete the configuration for
eno2andeno3Use Persistent static IP configuration instructions to apply static IPs to both interfaces.
Interface
IP
Subnet Mask
Prefix
CIDR Notation
eno2
192.168.0.1
255.255.240.0
20
192.168.0.1/20
eno3
192.168.16.1
255.255.240.0
20
192.168.16.1/20
3.2.2. Listen to traffic via tcpdump
You can learn the MAC addresses of the BMCs by listening to the traffic on the IPMI network port. They will send DHCP requests asking for an IP address. Remember, this is a broadcast, so anyone listening for these messages can answer them. That is why you should only have on DHCP server listening on a network!
Install the
tcpdumputility[root@master ~]# dnf install tcpdump
Launch
tcpdumpand listen for packets[root@master ~]# tcpdump -i eno2 port bootps dropped privs to tcpdump tcpdump: verbose output suppressed, use -v[v]... for full protocol decode listening on eno2, link-type EN10MB (Ethernet), snapshot length 262144 bytes 15:06:22.539367 IP 0.0.0.0.bootpc > 255.255.255.255.bootps: BOOTP/DHCP, Request from 7c:c2:55:ed:2d:0b (oui Unknown), length 300 15:06:22.568331 IP 0.0.0.0.bootpc > 255.255.255.255.bootps: BOOTP/DHCP, Request from 7c:c2:55:ed:2d:55 (oui Unknown), length 300
You can gain more insight into what the request contains using the
-vv. Some vendors include information such as Service Tag which could help you identify the machine.[root@master ~]# tcpdump -i eno2 -vv port bootps dropped privs to tcpdump tcpdump: listening on eno2, link-type EN10MB (Ethernet), snapshot length 262144 bytes 15:07:15.028974 IP (tos 0x0, ttl 64, id 0, offset 0, flags [none], proto UDP (17), length 328) 0.0.0.0.bootpc > 255.255.255.255.bootps: [udp sum ok] BOOTP/DHCP, Request from 7c:c2:55:ed:2d:0b (oui Unknown), length 300, xid 0x153e141e, secs 40514, Flags [none] (0x0000) Client-Ethernet-Address 7c:c2:55:ed:2d:0b (oui Unknown) Vendor-rfc1048 Extensions Magic Cookie 0x63825363 DHCP-Message (53), length 1: Discover Client-ID (61), length 7: ether 7c:c2:55:ed:2d:0b MSZ (57), length 2: 576 Parameter-Request (55), length 7: Subnet-Mask (1), Default-Gateway (3), Domain-Name-Server (6), Hostname (12) Domain-Name (15), BR (28), NTP (42) Vendor-Class (60), length 12: "udhcp 1.23.1"
Decide which server is c01, and c02 and write down their BMC MAC addresses and assign IP addresses within the management network subnet to them. Note, MAC addresses are unique for every system.
Example:
Hostname
BMC MAC
IPMI IP
c01.mgmt
bc:24:11:1d:a5:4d
192.168.1.1
c02.mgmt
bc:24:11:27:3d:f5
192.168.1.2
3.2.3. Set up DHCP for the management network (IPMI)
Our master node will run a DHCP server to respond to the DHCP requests and assign static IPs to our BMCs.
Install a DHCP server
There are multiple packages which can perform this function, we will use the
keapackage in Alma Linux.[root@master ~]# dnf install kea
Configure the DHCP server
The default Kea configuration is not useful to us. So, navigate to
/etc/keaand delete all the configuration files you find there. Next create two new configuration files. The first file/etc/kea/kea-dhcp4.confwill contain some boilerplate configuration and import our mgmt subnet configuration from the second file.{ "Dhcp4": { "interfaces-config": { "interfaces": [ "eno2", "eno3" ] }, "lease-database": { "type": "memfile", "persist": true, "name": "/var/lib/kea/dhcp4.leases" }, "subnet4": [ <?include "/etc/kea/mgmt-subnet.json"?> ], "valid-lifetime": 7200, "renew-timer": 600, "rebind-timer": 1800, "match-client-id": false, "loggers": [ { "name": "kea-dhcp4", "output_options": [ { "output": "/var/log/kea/kea-dhcp4.log" } ], "severity": "INFO" } ] } }
The second file
/etc/kea/mgmt-subnet.jsonwill configure the IPMI subnet and add two host declarations to specify fixed IPs. When creating the file, edithw-addressto use the MAC addresses discovered usingtcpdump. Note, MAC addresses are unique for every system.{ "id": 1, "subnet": "192.168.0.0/20", "interface": "eno2", "option-data": [ { "name": "routers", "data": "192.168.0.1" }, { "name": "domain-name", "data": "mgmt" }, { "name": "domain-name-servers", "data": "192.168.0.1" }, { "name": "subnet-mask", "data": "255.255.240.0" } ], "reservations": [ { "hw-address": "bc:24:11:aa:78:43", "ip-address": "192.168.1.1", "hostname": "c01" }, { "hw-address": "bc:24:11:64:8f:6f", "ip-address": "192.168.1.2", "hostname": "c02" } ] }
Start the DHCP server
[root@master ~]# systemctl enable kea-dhcp4
[root@master ~]# systemctl start kea-dhcp4
Observe DHCP traffic and ping BMCs
If you connect a BMC to the network you should see something similar to the following traffic
[root@master ~]# tcpdump -i eno2 port bootps
dropped privs to tcpdump
tcpdump: verbose output suppressed, use -v or -vv for full protocol decode
listening on eno2, link-type EN10MB (Ethernet), capture size 262144 bytes
09:27:27.452623 IP 0.0.0.0.bootpc > 255.255.255.255.bootps: BOOTP/DHCP, Request from 7c:c2:55:ed:2d:55 (oui Unknown), length 300
09:27:27.454690 IP master1.bootps > 192.168.1.2.bootpc: BOOTP/DHCP, Reply, length 311
09:27:27.535298 IP 0.0.0.0.bootpc > 255.255.255.255.bootps: BOOTP/DHCP, Request from 7c:c2:55:ed:2d:55 (oui Unknown), length 300
09:27:27.537035 IP master1.bootps > 192.168.1.2.bootpc: BOOTP/DHCP, Reply, length 311
Try to ping the BMCs using their IP addresses
[root@master ~]# ping 192.168.1.1
PING 192.168.1.1 (192.168.1.1) 56(84) bytes of data.
64 bytes from 192.168.1.1: icmp_seq=1 ttl=64 time=0.323 ms
64 bytes from 192.168.1.1: icmp_seq=2 ttl=64 time=0.514 ms
...
[root@master ~]# ping 192.168.1.2
...
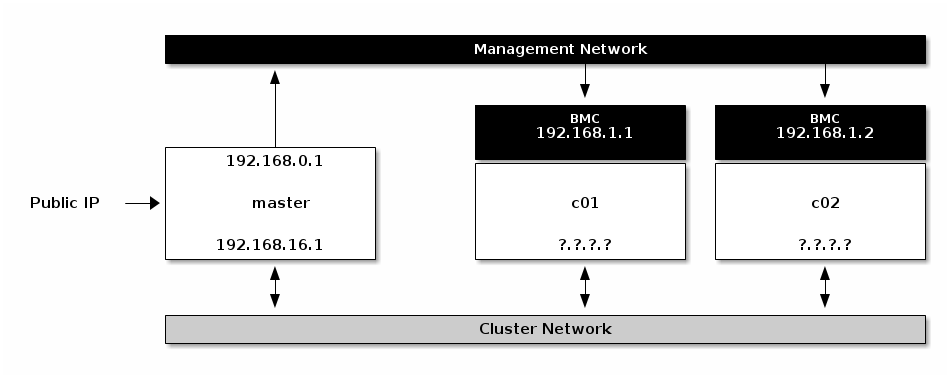
BMCs with assigned IPs via DHCP